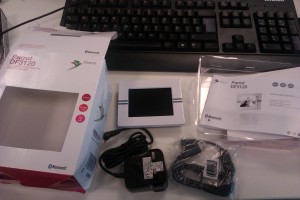
He adquirido el marco digital de fotos Parrot DF3120. Es un marco que por menos de 20€ puede representar fotografías en una pantalla de 320×240 (3.5″). Sus puntos fuertes es que tiene bluetooth para poder subir las imagenes desde, por ejemplo, un móvil y una entrada para tarjetas SD con la misma función.
Este marco ha sido hackeado y se le puede instalar un linux, con las ventajas que ello representa. El objetivo de este primer artículo es mostrar el proceso de instalación de linux y cómo acceder a este de una forma sencilla.
Lo primero es hacer un duplicado de disco del siguiente fichero: minifs-full-ext.img. Esto en linux, siendo root, se consigue con el siguiente comando (disco SD es el nombre que le haya asignado el sistema):
|
1 |
dd if=minifs-full-ext.img of=/dev/<disco SD> |
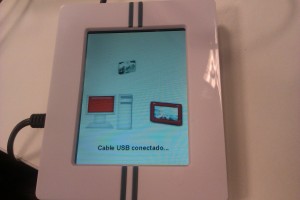
Lo siguiente es actualizar el firmware del marco. Para ello hay que encender el marco sin ninguna tarjeta SD insertada y enchufar el cable usb. Cuando podamos acceder al contenido del disco, crear una carpeta llamada update y dentro de esta copiar el fichero parrotDF3120.plf. Después sacar el usb de forma segura y veremos que aparecen 4 cuadros en la pantalla (uno azul y el resto verde), momento en el cual ya se ha actualizado el firmware.
Ahora tenemos un modo de arranque dual. Por un lado si encendemos el marco sin más veremos su funcionalidad de siempre, es decir, se visualizarán las imágenes que tengamos almacenadas una detrás de otra. Pero si metemos la tarjeta SD y antes de encenderlo pulsamos los botones izquierdo y central de la parte de atrás y, sin soltarlos, encendemos el marco, se arrancará linux y busybox.
Finalmente para acceder a la consola en el modo linux podemos hacerlo de dos formas (la dificil y la fácil):
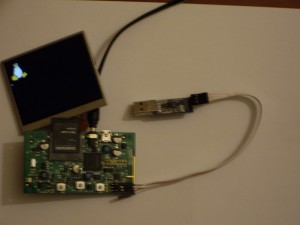
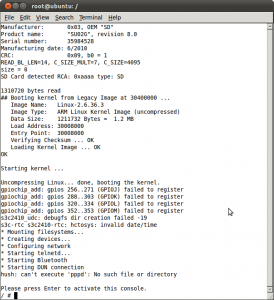
La dificil es sacar todos los tornillos para quedarnos con la placa y la pantalla. A continuación soldamos en los agujeros del J4 (la consola serie) los tres pines (1: GND, 2: RX, 3: TX) y nos buscamos un conversor TTL a puerto serie o a usb para poder comunicarnos con el dispositivo usando los siguientes parámetros de conexión: 115200 8,N,1 (recomiendo screen en linux o mac y putty en windows). Esta es la consola serie donde se ven los mensajes de estado del arranque y luego se obtiene una shell donde interactuar con linux:
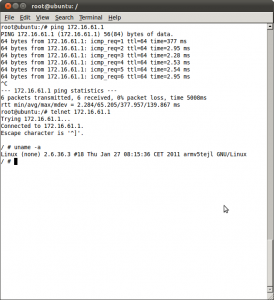
La fácil es simplemente conectar el cable usb al marco y a nuestro ordenador, lo que nos configurará una conexión ethernet por usb llamada Ethernet Gadget, la cual será una tarjeta de red que debemos configurar con la IP 172.16.61.2 y la máscara de red 255.255.255.0. Si todo ha ido bien y hacemos un ping a la dirección 172.16.61.1 el marco nos debería responder. Finalmente para acceder a una shell sólo hay que hacer un telnet a la IP comentada.
Edición 22/01/2011:
En el marco vienen unos programas para probar la pantalla gráfica. Podeis ejecutar cualquiera de ellos:
/usr/bin/plasma: Una bonita demo sobre el efecto plasma.
/usr/bin/newvox: Un paisaje que si tuvieramos teclado podríamos recorrerlo.
Edición 12/02/2011:

¡Muy buen trabajo!
Yo he pedido un par de marcos de estos por eBay y tengo pensado hackearlos cuando tenga un rato. También tengo por aquí un par de chips de memoria MT48LC16M16A2P-75 que voy a intentar utilizar para ampliar la RAM de 8 a 32MB.
Lástima que este aparato no tenga un interfaz USB HOST. Si lo tuviese, se podría montar un NAS o gestor de descargas o algo así de modo super económico.
Gracias.
Si te parece bien comenta por aquí como te ha ido con la actualización de memoria o si tienes un enlace a un blog donde lo expliques. Creo que sería interesante para la gente ver cómo aumentar las capacidades de este marco digital no tan modesto.
Este marco es ideal para mostrar pantallas de información: domótica, telemetría, estado de servidores o de una red, etc.
Valla, te has adelantado por un día. Hoy he recibido mis dos unidades.
Voy a ampliar la memoria ya mismo, lo he hecho muchas veces con routers linksys. USB host sí tienen, dos. Uno comparte pines con el USB slave y el otro esta libre, voy a ver si localizo los pads y puedo hacer algo. ¿Se ve en el /dev o en el registro de arranque del kernel si lo ha detectado?
Esto es lo que sale con dmesg:
Linux version 2.6.36.3 (claude@debian) (gcc version 4.4.5 (crosstool-NG-1.9.2) ) #18 Thu Jan 27 08:15:36 CET 2011 at 0
CPU: ARM926EJ-S [41069265] revision 5 (ARMv5TEJ), cr=00053177
CPU: VIVT data cache, VIVT instruction cache
Machine: DF3120
Memory policy: ECC disabled, Data cache writeback
CPU S3C2412 (id 0x32412003)
S3C24XX Clocks, Copyright 2004 Simtec Electronics
S3C2412: core 266.500 MHz, memory 133.250 MHz, peripheral 66.625 MHz
usysclk: parent urefclk
i2sclk: parent mpll
camif-upll: parent usysclk
msysclk: parent mpll
uartclk: parent mpll
usbsrc: parent usysclk
erefclk: parent ext
urefclk: parent ext
S3C2412: DVS is off
Warning: USB bus clock not at 48MHz
S3C2412: upll on, 96.000 MHz, usb-bus 48.000 MHz
On node 0 totalpages: 2048
free_area_init_node: node 0, pgdat c0232644, node_mem_map c0247000
Normal zone: 16 pages used for memmap
Normal zone: 0 pages reserved
Normal zone: 2032 pages, LIFO batch:0
Built 1 zonelists in Zone order, mobility grouping off. Total pages: 2032
Kernel command line: root=/dev/mmcblk0p1 console=ttySAC2,115200 quiet rootdelay=2
PID hash table entries: 32 (order: -5, 128 bytes)
Dentry cache hash table entries: 1024 (order: 0, 4096 bytes)
Inode-cache hash table entries: 1024 (order: 0, 4096 bytes)
Memory: 8MB = 8MB total
Memory: 5788k/5788k available, 2404k reserved, 0K highmem
Virtual kernel memory layout:
vector : 0xffff0000 – 0xffff1000 ( 4 kB)
fixmap : 0xfff00000 – 0xfffe0000 ( 896 kB)
DMA : 0xffc00000 – 0xffe00000 ( 2 MB)
vmalloc : 0xc1000000 – 0xe0000000 ( 496 MB)
lowmem : 0xc0000000 – 0xc0800000 ( 8 MB)
modules : 0xbf000000 – 0xc0000000 ( 16 MB)
.init : 0xc0008000 – 0xc0020000 ( 96 kB)
.text : 0xc0020000 – 0xc021c000 (2032 kB)
.data : 0xc021c000 – 0xc0232c60 ( 92 kB)
NR_IRQS:85
irq: clearing pending ext status 00050318
irq: clearing pending ext status 00050300
irq: clearing subpending status 000001c0
irq: clearing subpending status 00000080
timer tcon=0052d222, tcnt d8df, tcfg 00000200,00002222, usec 0000170e
Console: colour dummy device 80×30
console [ttySAC2] enabled
Calibrating delay loop… 132.71 BogoMIPS (lpj=331776)
pid_max: default: 4096 minimum: 301
Mount-cache hash table entries: 512
CPU: Testing write buffer coherency: ok
devtmpfs: initialized
gpiochip_add: gpios 256..271 (GPIOJ) failed to register
gpiochip_add: gpios 288..303 (GPIOK) failed to register
gpiochip_add: gpios 320..334 (GPIOL) failed to register
gpiochip_add: gpios 352..353 (GPIOM) failed to register
NET: Registered protocol family 16
Set BCM2045 GPIOs
S3C2412: Initialising architecture
S3C24XX DMA Driver, Copyright 2003-2006 Simtec Electronics
DMA channel 0 at c1008000, irq 33
DMA channel 1 at c1008040, irq 34
DMA channel 2 at c1008080, irq 35
DMA channel 3 at c10080c0, irq 36
s3c-adc s3c24xx-adc: attached adc driver
s3c24xx-pwm s3c24xx-pwm.1: tin at 8328125, tdiv at 8328125, tin=divclk, base 8
s3c24xx-pwm s3c24xx-pwm.2: tin at 2776041, tdiv at 2776041, tin=divclk, base 12
bio: create slab
SCSI subsystem initialized
Bluetooth: Core ver 2.15
NET: Registered protocol family 31
Bluetooth: HCI device and connection manager initialized
Bluetooth: HCI socket layer initialized
NET: Registered protocol family 2
IP route cache hash table entries: 1024 (order: 0, 4096 bytes)
TCP established hash table entries: 512 (order: 0, 4096 bytes)
TCP bind hash table entries: 512 (order: -1, 2048 bytes)
TCP: Hash tables configured (established 512 bind 512)
TCP reno registered
NET: Registered protocol family 1
msgmni has been set to 16
io scheduler noop registered (default)
Console: switching to colour frame buffer device 80×40
fb0: s3c2410fb frame buffer device
s3c2412-uart.0: ttySAC0 at MMIO 0x50000000 (irq = 70) is a S3C2412
s3c2412-uart.1: ttySAC1 at MMIO 0x50004000 (irq = 73) is a S3C2412
s3c2412-uart.2: ttySAC2 at MMIO 0x50008000 (irq = 76) is a S3C2412
S3C24XX NAND Driver, (c) 2004 Simtec Electronics
s3c24xx-nand s3c2412-nand: Tacls=3, 22ns Twrph0=8 60ns, Twrph1=3 22ns
s3c24xx-nand s3c2412-nand: System booted from NAND
s3c24xx-nand s3c2412-nand: NAND soft ECC
NAND device: Manufacturer ID: 0xec, Chip ID: 0x75 (Samsung NAND 32MiB 3,3V 8-bit)
Scanning device for bad blocks
cmdlinepart partition parsing not available
Creating 4 MTD partitions on «NAND»:
0x000000000000-0x000000040000 : «u-boot»
0x000000040000-0x000000048000 : «u-boot-env»
0x000000048000-0x000000248000 : «Kernel»
0x000000248000-0x000002000000 : «root»
PPP generic driver version 2.4.2
PPP Deflate Compression module registered
PPP BSD Compression module registered
s3c2410_udc: debugfs dir creation failed -19
g_ether gadget: using random self ethernet address
g_ether gadget: using random host ethernet address
usb0: MAC 6e:25:98:76:37:45
usb0: HOST MAC 0e:97:5c:b7:f5:49
g_ether gadget: Ethernet Gadget, version: Memorial Day 2008
g_ether gadget: g_ether ready
mice: PS/2 mouse device common for all mice
input: gpio-keys as /devices/platform/gpio-keys/input/input0
evbug.c: Connected device: input0 (gpio-keys at gpio-keys/input0)
evbug.c: Event. Dev: input0, Type: 0, Code: 0, Value: 0
evbug.c: Event. Dev: input0, Type: 1, Code: 28, Value: 1
evbug.c: Event. Dev: input0, Type: 0, Code: 0, Value: 0
evbug.c: Event. Dev: input0, Type: 1, Code: 106, Value: 1
evbug.c: Event. Dev: input0, Type: 0, Code: 0, Value: 0
S3C24XX RTC, (c) 2004,2006 Simtec Electronics
s3c-rtc s3c2410-rtc: rtc disabled, re-enabling
s3c-rtc s3c2410-rtc: rtc core: registered s3c as rtc0
Bluetooth: HCI UART driver ver 2.2
Bluetooth: HCI H4 protocol initialized
cpuidle: using governor ladder
s3c-sdi s3c2412-sdi: powered down.
s3c-sdi s3c2412-sdi: mmc0 – using pio, hw SDIO IRQ
TCP cubic registered
Bluetooth: L2CAP ver 2.15
Bluetooth: L2CAP socket layer initialized
Bluetooth: SCO (Voice Link) ver 0.6
Bluetooth: SCO socket layer initialized
Bluetooth: RFCOMM TTY layer initialized
Bluetooth: RFCOMM socket layer initialized
Bluetooth: RFCOMM ver 1.11
Bluetooth: BNEP (Ethernet Emulation) ver 1.3
Bluetooth: HIDP (Human Interface Emulation) ver 1.2
s3c-rtc s3c2410-rtc: hctosys: invalid date/time
Waiting 2sec before mounting root device…
s3c-sdi s3c2412-sdi: running at 0kHz (requested: 0kHz).
s3c-sdi s3c2412-sdi: running at 398kHz (requested: 400kHz).
s3c-sdi s3c2412-sdi: running at 398kHz (requested: 400kHz).
s3c-sdi s3c2412-sdi: running at 398kHz (requested: 400kHz).
s3c-sdi s3c2412-sdi: running at 398kHz (requested: 400kHz).
s3c-sdi s3c2412-sdi: running at 398kHz (requested: 400kHz).
s3c-sdi s3c2412-sdi: running at 398kHz (requested: 400kHz).
s3c-sdi s3c2412-sdi: running at 398kHz (requested: 400kHz).
s3c-sdi s3c2412-sdi: running at 22208kHz (requested: 25000kHz).
s3c-sdi s3c2412-sdi: running at 22208kHz (requested: 25000kHz).
mmc0: new SD card at address c667
mmcblk0: mmc0:c667 SU02G 1.84 GiB
mmcblk0: p1
g_ether gadget: full speed config #1: CDC Ethernet (EEM)
EXT2-fs (mmcblk0p1): warning: feature flags set on rev 0 fs, running e2fsck is recommended
EXT2-fs (mmcblk0p1): warning: mounting ext3 filesystem as ext2
EXT2-fs (mmcblk0p1): warning: mounting unchecked fs, running e2fsck is recommended
VFS: Mounted root (ext2 filesystem) on device 179:1.
devtmpfs: mounted
Freeing init memory: 96K
g_ether gadget: full speed config #1: CDC Ethernet (EEM)
Y esta es la lista de /dev
drwxr-xr-x 5 root root 0 Jan 1 00:00 .
drwxr-xr-x 15 root root 1024 Jan 27 2011 ..
crw-rw—- 1 root root 5, 1 Jan 1 00:00 console
crw-rw—- 1 root root 10, 63 Jan 1 00:00 cpu_dma_latency
crw-rw—- 1 root root 13, 64 Jan 1 00:00 event0
crw-rw—- 1 root root 29, 0 Jan 1 00:00 fb0
crw-rw—- 1 root root 1, 7 Jan 1 00:00 full
drwxr-xr-x 2 root root 0 Jan 1 00:00 input
crw-rw—- 1 root root 1, 11 Jan 1 00:00 kmsg
srw-rw-rw- 1 root root 0 Jan 1 00:00 log
crw-rw—- 1 root root 1, 1 Jan 1 00:00 mem
crw-rw—- 1 root root 13, 63 Jan 1 00:00 mice
brw-rw—- 1 root root 179, 0 Jan 1 00:00 mmcblk0
brw-rw—- 1 root root 179, 1 Jan 1 00:00 mmcblk0p1
crw-rw—- 1 root root 90, 0 Jan 1 00:00 mtd0
crw-rw—- 1 root root 90, 1 Jan 1 00:00 mtd0ro
crw-rw—- 1 root root 90, 2 Jan 1 00:00 mtd1
crw-rw—- 1 root root 90, 3 Jan 1 00:00 mtd1ro
crw-rw—- 1 root root 90, 4 Jan 1 00:00 mtd2
crw-rw—- 1 root root 90, 5 Jan 1 00:00 mtd2ro
crw-rw—- 1 root root 90, 6 Jan 1 00:00 mtd3
crw-rw—- 1 root root 90, 7 Jan 1 00:00 mtd3ro
crw-rw—- 1 root root 10, 62 Jan 1 00:00 network_latency
crw-rw—- 1 root root 10, 61 Jan 1 00:00 network_throughput
crw-rw—- 1 root root 1, 3 Jan 1 00:00 null
crw-rw—- 1 root root 108, 0 Jan 1 00:00 ppp
crw-rw—- 1 root root 5, 2 Jan 1 00:20 ptmx
drwxr-xr-x 2 root root 0 Jan 1 00:00 pts
crw-rw—- 1 root root 1, 8 Jan 1 00:00 random
crw——- 1 root root 216, 0 Jan 1 00:00 rfcomm0
lrwxrwxrwx 1 root root 9 Jan 1 00:00 root -> mmcblk0p1
crw-rw—- 1 root root 254, 0 Jan 1 00:00 rtc0
drwxr-xr-x 2 root root 0 Jan 1 00:00 shm
crw-rw—- 1 root root 5, 0 Jan 1 00:00 tty
crw-rw—- 1 root root 4, 0 Jan 1 00:00 tty0
crw-rw—- 1 root root 4, 1 Jan 1 00:00 tty1
crw-rw—- 1 root root 4, 10 Jan 1 00:00 tty10
crw-rw—- 1 root root 4, 11 Jan 1 00:00 tty11
crw-rw—- 1 root root 4, 12 Jan 1 00:00 tty12
crw-rw—- 1 root root 4, 13 Jan 1 00:00 tty13
crw-rw—- 1 root root 4, 14 Jan 1 00:00 tty14
crw-rw—- 1 root root 4, 15 Jan 1 00:00 tty15
crw-rw—- 1 root root 4, 16 Jan 1 00:00 tty16
crw-rw—- 1 root root 4, 17 Jan 1 00:00 tty17
crw-rw—- 1 root root 4, 18 Jan 1 00:00 tty18
crw-rw—- 1 root root 4, 19 Jan 1 00:00 tty19
crw-rw—- 1 root root 4, 2 Jan 1 00:00 tty2
crw-rw—- 1 root root 4, 20 Jan 1 00:00 tty20
crw-rw—- 1 root root 4, 21 Jan 1 00:00 tty21
crw-rw—- 1 root root 4, 22 Jan 1 00:00 tty22
crw-rw—- 1 root root 4, 23 Jan 1 00:00 tty23
crw-rw—- 1 root root 4, 24 Jan 1 00:00 tty24
crw-rw—- 1 root root 4, 25 Jan 1 00:00 tty25
crw-rw—- 1 root root 4, 26 Jan 1 00:00 tty26
crw-rw—- 1 root root 4, 27 Jan 1 00:00 tty27
crw-rw—- 1 root root 4, 28 Jan 1 00:00 tty28
crw-rw—- 1 root root 4, 29 Jan 1 00:00 tty29
crw-rw—- 1 root root 4, 3 Jan 1 00:00 tty3
crw-rw—- 1 root root 4, 30 Jan 1 00:00 tty30
crw-rw—- 1 root root 4, 31 Jan 1 00:00 tty31
crw-rw—- 1 root root 4, 32 Jan 1 00:00 tty32
crw-rw—- 1 root root 4, 33 Jan 1 00:00 tty33
crw-rw—- 1 root root 4, 34 Jan 1 00:00 tty34
crw-rw—- 1 root root 4, 35 Jan 1 00:00 tty35
crw-rw—- 1 root root 4, 36 Jan 1 00:00 tty36
crw-rw—- 1 root root 4, 37 Jan 1 00:00 tty37
crw-rw—- 1 root root 4, 38 Jan 1 00:00 tty38
crw-rw—- 1 root root 4, 39 Jan 1 00:00 tty39
crw-rw—- 1 root root 4, 4 Jan 1 00:00 tty4
crw-rw—- 1 root root 4, 40 Jan 1 00:00 tty40
crw-rw—- 1 root root 4, 41 Jan 1 00:00 tty41
crw-rw—- 1 root root 4, 42 Jan 1 00:00 tty42
crw-rw—- 1 root root 4, 43 Jan 1 00:00 tty43
crw-rw—- 1 root root 4, 44 Jan 1 00:00 tty44
crw-rw—- 1 root root 4, 45 Jan 1 00:00 tty45
crw-rw—- 1 root root 4, 46 Jan 1 00:00 tty46
crw-rw—- 1 root root 4, 47 Jan 1 00:00 tty47
crw-rw—- 1 root root 4, 48 Jan 1 00:00 tty48
crw-rw—- 1 root root 4, 49 Jan 1 00:00 tty49
crw-rw—- 1 root root 4, 5 Jan 1 00:00 tty5
crw-rw—- 1 root root 4, 50 Jan 1 00:00 tty50
crw-rw—- 1 root root 4, 51 Jan 1 00:00 tty51
crw-rw—- 1 root root 4, 52 Jan 1 00:00 tty52
crw-rw—- 1 root root 4, 53 Jan 1 00:00 tty53
crw-rw—- 1 root root 4, 54 Jan 1 00:00 tty54
crw-rw—- 1 root root 4, 55 Jan 1 00:00 tty55
crw-rw—- 1 root root 4, 56 Jan 1 00:00 tty56
crw-rw—- 1 root root 4, 57 Jan 1 00:00 tty57
crw-rw—- 1 root root 4, 58 Jan 1 00:00 tty58
crw-rw—- 1 root root 4, 59 Jan 1 00:00 tty59
crw-rw—- 1 root root 4, 6 Jan 1 00:00 tty6
crw-rw—- 1 root root 4, 60 Jan 1 00:00 tty60
crw-rw—- 1 root root 4, 61 Jan 1 00:00 tty61
crw-rw—- 1 root root 4, 62 Jan 1 00:00 tty62
crw-rw—- 1 root root 4, 63 Jan 1 00:00 tty63
crw-rw—- 1 root root 4, 7 Jan 1 00:00 tty7
crw-rw—- 1 root root 4, 8 Jan 1 00:00 tty8
crw-rw—- 1 root root 4, 9 Jan 1 00:00 tty9
crw-rw—- 1 root root 204, 64 Jan 1 00:00 ttySAC0
crw-rw—- 1 root root 204, 65 Jan 1 00:00 ttySAC1
crw-rw—- 1 root root 204, 66 Jan 1 00:00 ttySAC2
crw-rw—- 1 root root 10, 223 Jan 1 00:00 uinput
crw-rw—- 1 root root 1, 9 Jan 1 00:00 urandom
crw-rw—- 1 root root 7, 0 Jan 1 00:00 vcs
crw-rw—- 1 root root 7, 1 Jan 1 00:00 vcs1
crw-rw—- 1 root root 7, 128 Jan 1 00:00 vcsa
crw-rw—- 1 root root 7, 129 Jan 1 00:00 vcsa1
crw-rw—- 1 root root 1, 5 Jan 1 00:00 zero
No se puede sacar el USB0 host. Los pads T12 y N14 del micro no estan conectados a nada… La única solución sería modificar el firmware para usar el USB slave como HOST (usan los mismos pines) pero entonces se perdería el SLAVE.
Voy a tratar de usar las dos entradas del sensor de orientación para un touchpad PS2, pero tendré que modificar el driver PS2. Tambien pueden usarse para un I2C.
Estoy mirando el toolchain para ver como compilar programas o usar los GPIO.
Ya he ampliado la memoria a los dos, he usado unas Hynyx HY5V461620HT-H de un viejo módulo DIMM de 128M PC133.
Ahora los marcos funcionan igual, pero en dmesg muestra que solo ha reconocido 8Mb.
Esto ya me paso con otro chisme: http://heli.xbot.es/wp/?p=35 y era el bootloader que realizaba la configuración del controlador de memoria y el linux se fiaba de lo que le decía el bootloader. La cantidad de memoria era un parámetro del bootloader, no hacía un test para medirla. Tuve que recompilar el bootloader con nuevos parámetros, muy peligroso, espero que funcione el JTAG.
Según la página de los hackers: «The original firmware doesn’t care if 8MB or 32MB are installed. You need to modify u-boot to take advantage of the expanded RAM in Linux.«. Por lo que efectivamente tienes que modificar el u-boot para indicarle explicitamente la memoria.
Pues es cierto, no lo había leido. Como ya tengo experiencia en estos lios me pondré a ello, aunque no he conseguido que funcione la toolchain…
o me encuentra el fichero libelf.h y da fallo de segmentación. Uso un SuSe 11.4 de 64 bits, probaré con otra de 32 bits.
He pensado en soldar unos pines torneados de un zócalo de circuito impreso en los taladros de los puertos serie y jtag y hacer unos taladritos en la carcasa trasera para poder conectar los cables sin abrir el chisme y sin que quede feo.
Tal como está aquí queda muy bien: https://sites.google.com/site/repurposelinux/df3120/adding-a-serial-console
Si, pero la idea es no tener que hacer ranuras ni cajeados. Si no dejas los lados bien rectos y limados queda muy feo, y ademas puede entrar partículas por el cajeado del JTAG. Haciendo solo pequeños taladritos para que pasen los pines no puede entrar nada, como si fueran taladros de ventilación.
Usaré una aguja caliente parsándola a través de los taladros del del circuito impreso hasta la carcasa para garantizar la alineación.
A ver que tal queda.
Cuando tengas eso y lo del u-boot para 32 megas dime el enlace de tu blog si vas a hacer un artículo para que lo ponga aquí.
Estáis haciendo un gran trabajo con este marco. Yo sigo esperando mis 2 unidades… a ver cuándo llegan.
Una lástima que los terminales del HOST USB no estén accesibles :(. Entonces, el puerto DEVICE que sí que está tirado, ¿es ON THE GO? ¿Podría configurarse como HOST por software? A mí personalmente no me importaría perder el DEVICE si con ello gano un HOST (que puedo enchufar a un HUB USB para conectar un stick WiFi o un adaptador Ethernet, un disco duro, e incluso un teclado/ratón/gamepad…).
Además si se puede hacer por software, pues cojonudo. Yo en el ON THE GO que llevan las beagleboard y que por defecto es DEVICE, recuerdo haberlo configurado como HOST jugando con la sysfs…
Hi,
Thank you for the great article 🙂
I have problem if you can help me.
I have update firmware on my parrot and it is getting me to the black screen but does not boot further.
So I connected directly on J4.
from there i see that linux is not booting becouse is tryes to boot from mmc 0:1
so I enterd command
ext2load mmc 1:0 0x30400000 linux
and
bootm
and now it is booting but with Kernel panic
Here is complete output
ext2load mmc 1:0 0x30400000 linux
bootm
U-Boot 1.3.2-moko12 (Jan 18 2011 – 20:50:55)
DRAM: 8 MB
NAND: 32 MiB
*** Warning – bad CRC or NAND, using default environment
USB: S3C2410 USB Deviced
In: serial
Out: serial
Err: serial
Hit any key to stop autoboot: 0
mmc: Probing for SDHC …
mmc: SD 2.0 or later card found
trying to detect SD Card…
Manufacturer: 0x03, OEM «SD»
Product name: «SD02G», revision 8.0
Serial number: 1345537704
Manufacturing date: 5/2008
CRC: 0x2a, b0 = 1
READ_BL_LEN=14, C_SIZE_MULT=7, C_SIZE=4095
size = 0
SD Card detected RCA: 0xb110 type: SD
bad MBR sector signature 0x0000
** Bad partition 1 **
Wrong Image Format for bootm command
ERROR: can’t get kernel image!
>ext2load mmc 1:0 0x30400000 linux
1310720 bytes read
>bootm
## Booting kernel from Legacy Image at 30400000 …
Image Name: Linux-2.6.36.3
Image Type: ARM Linux Kernel Image (uncompressed)
Data Size: 1211732 Bytes = 1.2 MB
Load Address: 30008000
Entry Point: 30008000
Verifying Checksum … OK
Loading Kernel Image … OK
OK
Starting kernel …
Uncompressing Linux… done, booting the kernel.
gpiochip_add: gpios 256..271 (GPIOJ) failed to register
gpiochip_add: gpios 288..303 (GPIOK) failed to register
gpiochip_add: gpios 320..334 (GPIOL) failed to register
gpiochip_add: gpios 352..353 (GPIOM) failed to register
s3c2410_udc: debugfs dir creation failed -19
s3c-rtc s3c2410-rtc: hctosys: invalid date/time
Kernel panic – not syncing: VFS: Unable to mount root fs on unknown-block(179,1)
Backtrace:
Function entered at [] from []
r7:c001b684 r6:00008000 r5:c0461000 r4:c02333d0
Function entered at [] from []
Function entered at [] from []
r3:00000000 r2:00000000 r1:c0409f60 r0:c01fdcef
Function entered at [] from []
Function entered at [] from []
r5:c001b699 r4:c0232d48
Function entered at [] from []
r5:c001ae68 r4:c0232ce0
Function entered at [] from []
r5:c0008588 r4:00000000
Am in windows now and when connected on usb it is recognized as Ethernet Gadged.
I will try to boot linux on my computer and see if I can connect to it that way.
Got it,
I created two ext2 partition on sd card and on first one I have copy all from mounted minifs-full-ext.img image.
Thank you now it boots 🙂
Fantastic. Did you copy with dd?
No, I mounted it with
mount -o loop minifs-full-ext.img /mnt/iso/
And used mc to copy all from /mnt/iso/ to mounted first partition of sd card.
I think that the problem was I did not create partition and then I have dd image on complete sd card and this is not working. System must be on a first partition to boot, so you need to create partition on a card, and then dd image to that partition.
Another thing is that dd will create ext3 partition not ext2 but I do not know if this couse problem with loader.
Hi,
Im stucked again.
After few days I have sucessfuly manage to get img file under debian, and now it all boots well and I can access the linux via telnet but I have a problem with «Read only file system»
I cannont create file or direcory under the box.
This is from dmesg
mmc0: new SD card at address b110
mmcblk0: mmc0:b110 SD02G 1.89 GiB
mmcblk0: p1
EXT2-fs (mmcblk0p1): warning: feature flags set on rev 0 fs, running e2fsck is recommended
EXT2-fs (mmcblk0p1): warning: mounting ext3 filesystem as ext2
VFS: Mounted root (ext2 filesystem) readonly on device 179:1.
devtmpfs: mounted
Freeing init memory: 92K
how can I umount mmcblk0p1 and mount it as a not read only
this is when I write mount
rootfs on / type rootfs (rw)
/dev/root on / type ext2 (ro,relatime)
devtmpfs on /dev type devtmpfs (rw,relatime,mode=0755)
/proc on /proc type proc (rw,relatime)
none on /sys type sysfs (rw,relatime)
devpts on /dev/pts type devpts (rw,relatime,mode=600)
none on /dev/shm type tmpfs (rw,relatime)
none on /dev/shm type tmpfs (rw,relatime)
and if i try to mount mmcblk0p1 I got
can’t read ‘/etc/fstab’: No such file or directory
So If you can plaese help.
Try to execute mount / / -o remount,rw
You should create files and directories now.
When I have send it I got it
solution is:
mount -w -o remount /dev/root
soory for spamming
Gracias por compartir esta información. Es impresionante lo que estás haciendo.
Todo ha ido bien en la instalación, pero no podemos ejecutar los programas gráficos que vienen incluidos por este error:
/usr/bin/newvox: ‘/usr/lib/libiconv.so.2’ is not an ELF file
/usr/bin/newvox: can’t load library ‘libiconv.so.2’
¿Os ha pasado a alguno?
Gracias !!!!
Da la sensación de que la tarjeta SD estuviese dañada en algún sector. Habéis probado con otra para descartar?
No, la verdad es que no, pero sabiendo que el error puede estar ahí vamos a probar con otras o formatear la actual.
Mil gracias y ánimo con el blog, eres inspirador para mucho 😉
Pingback: Como instalar Linux en un marco digital